> ## Documentation Index
> Fetch the complete documentation index at: https://help.standards.site/llms.txt
> Use this file to discover all available pages before exploring further.
# Localization
Enterprise
Translate your guidelines into multiple languages to reach a broader audience and increase engagement.
 ***
## Basics
All Standards projects start with the default language English. Additional languages can be added (up to 20), translated, and published. Once published, these additional languages can be switched between by the viewer of the site. They also can automatically be chosen by the viewer’s browser if they are in a region matching the added language.
### Fundamentals
* All visual assets, styles, and site design match between languages
* Text content can (and should) differ between languages
* Text content can be reset back to the default language and content
* Files used in fills like inside Media elements can differ per language
### Default language
The default language is both what displays in the **design** mode of the editor, and is the base language for automatic translations of other languages.
***
## Adding
***
## Basics
All Standards projects start with the default language English. Additional languages can be added (up to 20), translated, and published. Once published, these additional languages can be switched between by the viewer of the site. They also can automatically be chosen by the viewer’s browser if they are in a region matching the added language.
### Fundamentals
* All visual assets, styles, and site design match between languages
* Text content can (and should) differ between languages
* Text content can be reset back to the default language and content
* Files used in fills like inside Media elements can differ per language
### Default language
The default language is both what displays in the **design** mode of the editor, and is the base language for automatic translations of other languages.
***
## Adding
 Within the design or content editor, select the language dropdown from the top bar.
From the dropdown select `New language`
From the add language interface, select the language you would like to add
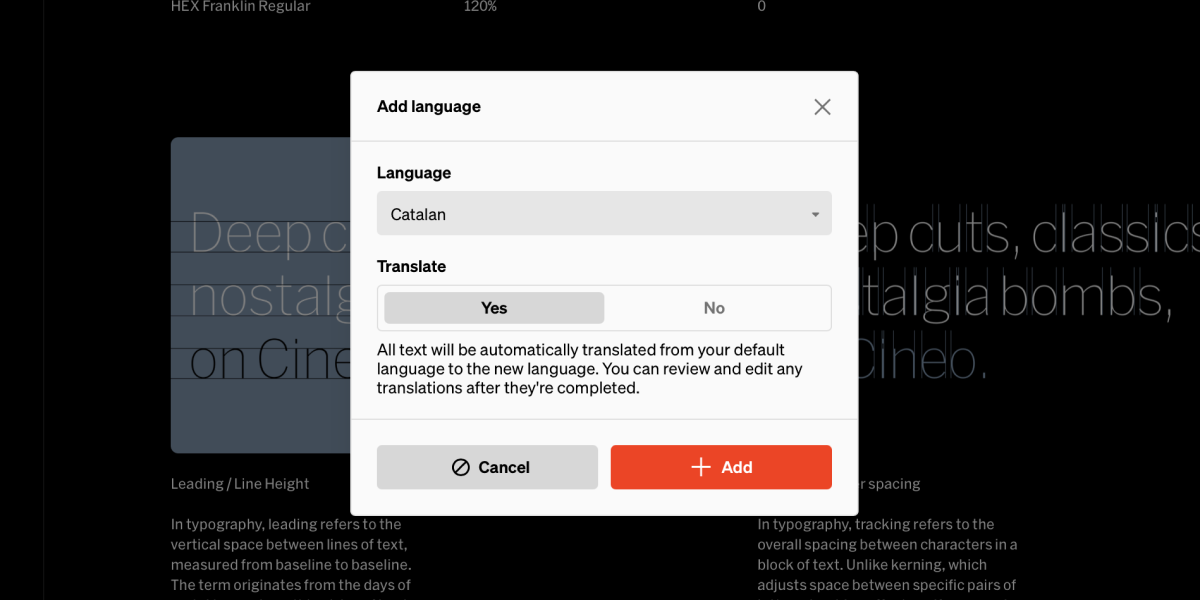
Lastly, choose if you want to automatically translate the new language.
**Tip:** Autotranslations can be overriden or completely reset.
***
## Editing
Once your site has multiple languages, each language’s text can be edited independently from one another. Keep in mind all visual assets, styles, and site design match between languages
Within the design or content editor, select the language dropdown from the top bar.
From the dropdown select `New language`
From the add language interface, select the language you would like to add
Lastly, choose if you want to automatically translate the new language.
**Tip:** Autotranslations can be overriden or completely reset.
***
## Editing
Once your site has multiple languages, each language’s text can be edited independently from one another. Keep in mind all visual assets, styles, and site design match between languages
 ### Select language to edit
Select a language from the globe icon dropdown in the top bar to enter the **Content** editing mode of that language.
### Editing
* Within the **Content** editing mode of the editor, select text by left-clicking on the text container, then clicking the text within
* Use the left and right icons to cycle to the previous and next block of text
* Use the translate icon to translate only the selected text block
* Translated text can be reset back to match the default language
### Hotkeys
Edit text quicker and mouse-free by utilizing keyboard hotkeys.
* **Left arrow:** Previous
* **Right arrow:** Next
* **Return:** Focus
* **Esc:** Unfocus
### Workflow
* Select some text with your mouse
* Press **return** on your keyboard
* Type edits or new text
* Press **esc** on your keyboard
* Press **right arrow** on your keyboard
* Repeat
***
## Automatic translations
Translate your site to a new language quickly using automatic translations. All text can be edited after the automatic translation completes, for fine-tuning.
### Select language to edit
Select a language from the globe icon dropdown in the top bar to enter the **Content** editing mode of that language.
### Editing
* Within the **Content** editing mode of the editor, select text by left-clicking on the text container, then clicking the text within
* Use the left and right icons to cycle to the previous and next block of text
* Use the translate icon to translate only the selected text block
* Translated text can be reset back to match the default language
### Hotkeys
Edit text quicker and mouse-free by utilizing keyboard hotkeys.
* **Left arrow:** Previous
* **Right arrow:** Next
* **Return:** Focus
* **Esc:** Unfocus
### Workflow
* Select some text with your mouse
* Press **return** on your keyboard
* Type edits or new text
* Press **esc** on your keyboard
* Press **right arrow** on your keyboard
* Repeat
***
## Automatic translations
Translate your site to a new language quickly using automatic translations. All text can be edited after the automatic translation completes, for fine-tuning.
 ### Translate all copy when adding language
In the process of adding a language, choose **Yes** to automatically the new language as it’s added.
### Translate all copy when adding language
In the process of adding a language, choose **Yes** to automatically the new language as it’s added.
 ### Translate all copy after languages have been added
Entire languages can be translated at any time. Within the **Content** editor, select the `Translate` button. Keep in mind this will automatically translate the chosen languages based on the default language, and all copy edits previously made will be lost.
### Translate all copy after languages have been added
Entire languages can be translated at any time. Within the **Content** editor, select the `Translate` button. Keep in mind this will automatically translate the chosen languages based on the default language, and all copy edits previously made will be lost.
 ### Selective
Within the **Content** editor, single blocks of text can be selectively translated by pressing the translate icon button that appears near text when it’s selected
***
## Change language
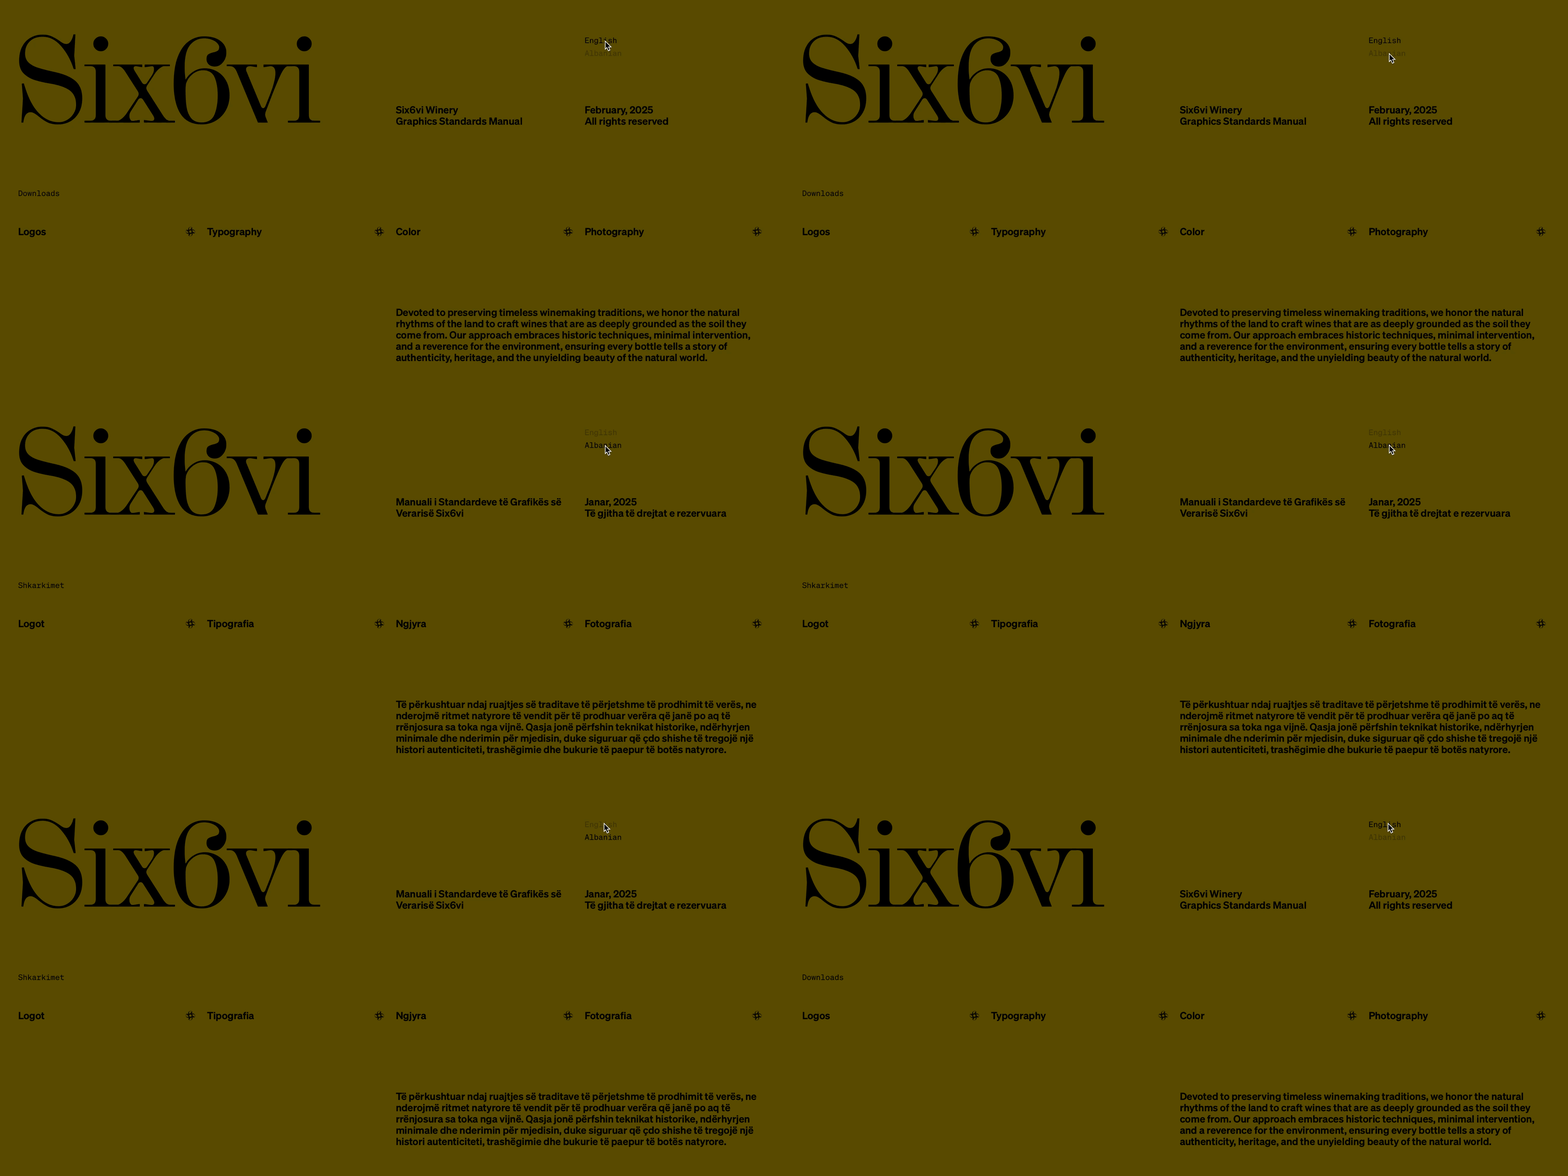
Once another language has been added and translated, you will want to create a way for viewers to toggle between them. The primary way of letting viewers change languages, is to set the behavior **On click » Change language** on some buttons.
### Selective
Within the **Content** editor, single blocks of text can be selectively translated by pressing the translate icon button that appears near text when it’s selected
***
## Change language
Once another language has been added and translated, you will want to create a way for viewers to toggle between them. The primary way of letting viewers change languages, is to set the behavior **On click » Change language** on some buttons.
 ### Add change language buttons
Within the design editor, select the add button tool B then select in body where to add it
Select the button, then select the click button (cursor clicking icon) from the contextual toolbar
Within the click behavior settings, selec the change language behavior. Then select the language the button will change the guidelines to.
Follow the same steps to add more buttons for additional languages
**Tip:** If there are many languages to switch between you could add the buttons inside of a dropdown D
Learn more about [buttons](/button) and [dropdowns](/dropdown)
***
## Alternate media
Standards’ localization goes beyond the text on screen, enabling alternate media to be chosen per language. This is especially helpful when media has ‘baked in’ text to show example designs, so every language has its own version.
### Add change language buttons
Within the design editor, select the add button tool B then select in body where to add it
Select the button, then select the click button (cursor clicking icon) from the contextual toolbar
Within the click behavior settings, selec the change language behavior. Then select the language the button will change the guidelines to.
Follow the same steps to add more buttons for additional languages
**Tip:** If there are many languages to switch between you could add the buttons inside of a dropdown D
Learn more about [buttons](/button) and [dropdowns](/dropdown)
***
## Alternate media
Standards’ localization goes beyond the text on screen, enabling alternate media to be chosen per language. This is especially helpful when media has ‘baked in’ text to show example designs, so every language has its own version.
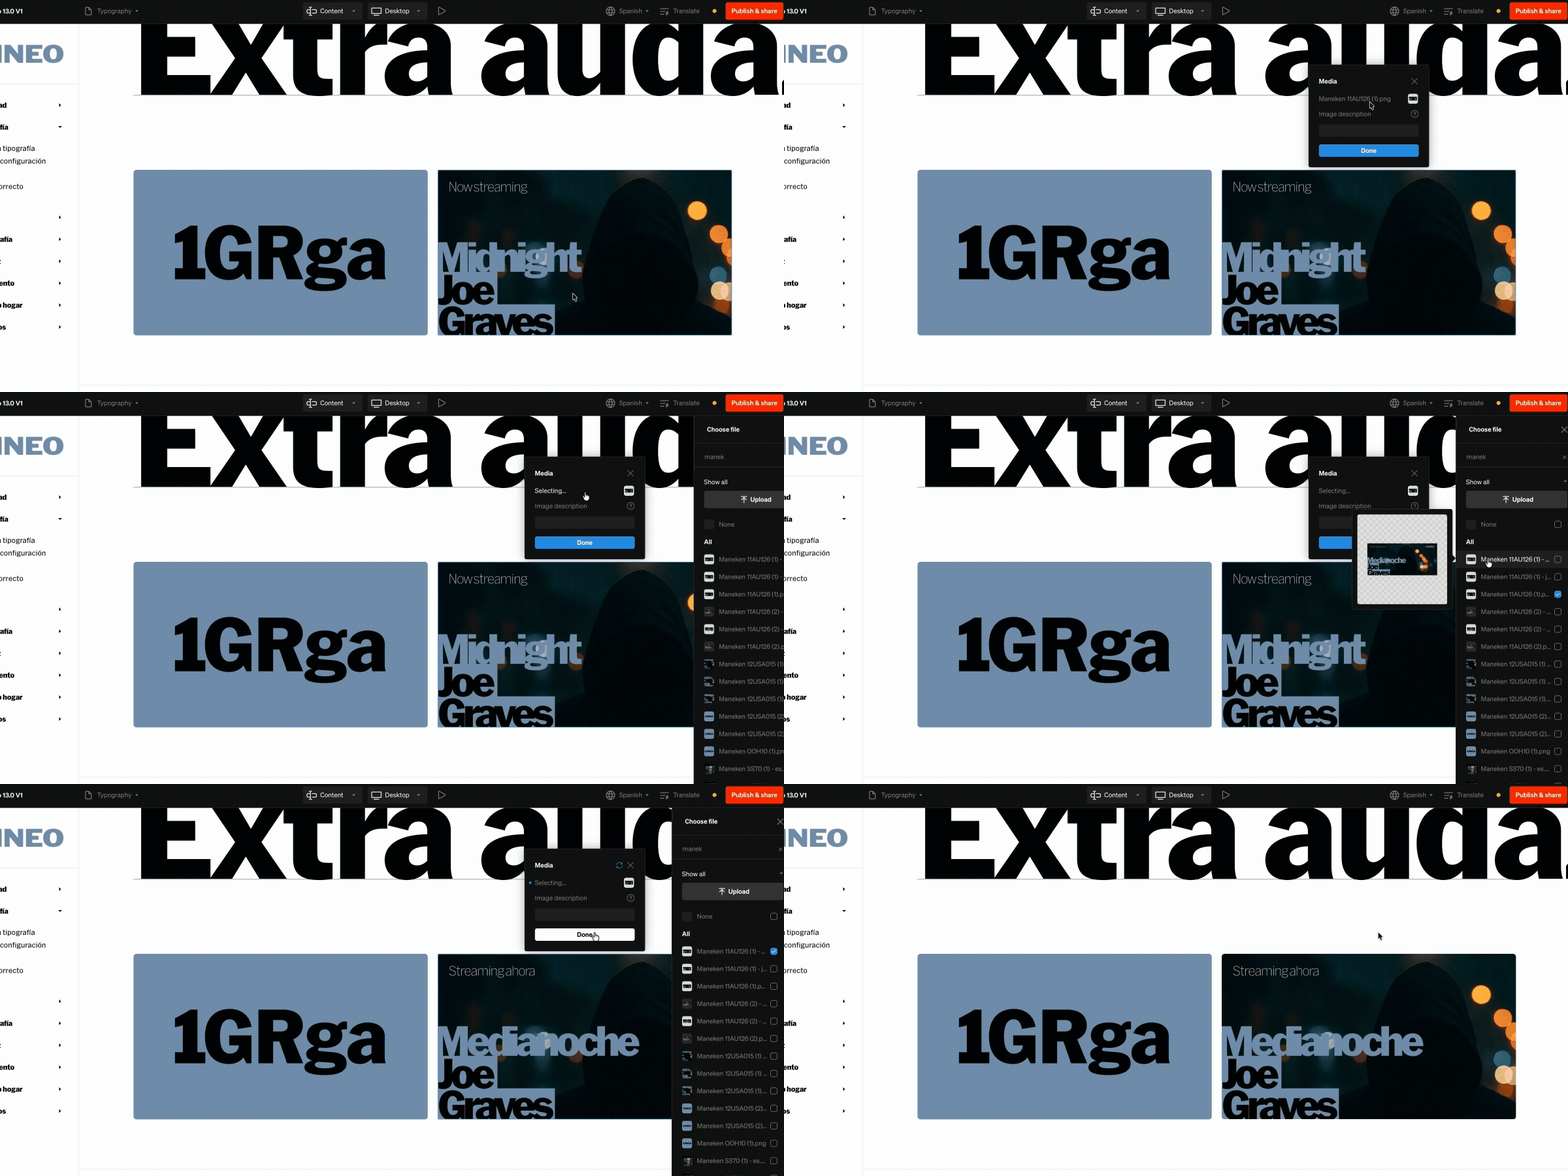 From within the project editor, select the preferred language to edit content from the top bar. The editor will change to content mode where copy and media can be changed
Select media to show the file and description.
Select the file, then choose another from the right sidebar, then select `done`
**Tip:** On media fills, you can change both the file used per language and breakpoint. For instance, a media element can have a mobile optimized version chosen, and a language optimized version of it can be chosen as well.
***
## Language settings
Every Standards site has language settings where the default language and text direction is set. All additional languages will also show here where the text direction can be set, and where they’re removed.
### Access language settings:
From within the project editor, select the language dropdown (globe icon) from the top bar
From the localization dropdown, select **Language settings** at the bottom
Manage the language settings in the right sidebar that appears. Choosing the text direction is a common setting update.
***
## FAQ
Please fill our [customer requirements form](https://forms.standards.site/customer_requirements) and we’ll follow up
Up to 20
No, there is essentially a single default site that additional languages use. Only text content needs to be updated for each language, all edited from the same editor.
Standards uses Google’s cloud translation API
Automatic translations will attempt to translate to the fullest degree, but proper nouns and idioms may not be translated. It is important to proof each language for accuracy after it has been added.
From within the project editor, select the preferred language to edit content from the top bar. The editor will change to content mode where copy and media can be changed
Select media to show the file and description.
Select the file, then choose another from the right sidebar, then select `done`
**Tip:** On media fills, you can change both the file used per language and breakpoint. For instance, a media element can have a mobile optimized version chosen, and a language optimized version of it can be chosen as well.
***
## Language settings
Every Standards site has language settings where the default language and text direction is set. All additional languages will also show here where the text direction can be set, and where they’re removed.
### Access language settings:
From within the project editor, select the language dropdown (globe icon) from the top bar
From the localization dropdown, select **Language settings** at the bottom
Manage the language settings in the right sidebar that appears. Choosing the text direction is a common setting update.
***
## FAQ
Please fill our [customer requirements form](https://forms.standards.site/customer_requirements) and we’ll follow up
Up to 20
No, there is essentially a single default site that additional languages use. Only text content needs to be updated for each language, all edited from the same editor.
Standards uses Google’s cloud translation API
Automatic translations will attempt to translate to the fullest degree, but proper nouns and idioms may not be translated. It is important to proof each language for accuracy after it has been added.