> ## Documentation Index
> Fetch the complete documentation index at: https://help.standards.site/llms.txt
> Use this file to discover all available pages before exploring further.
# Custom Domains
By default, projects are published to live.standards.site. Publish projects to domains you own by adding them to your workspace.
***
## Add a domain to Standards
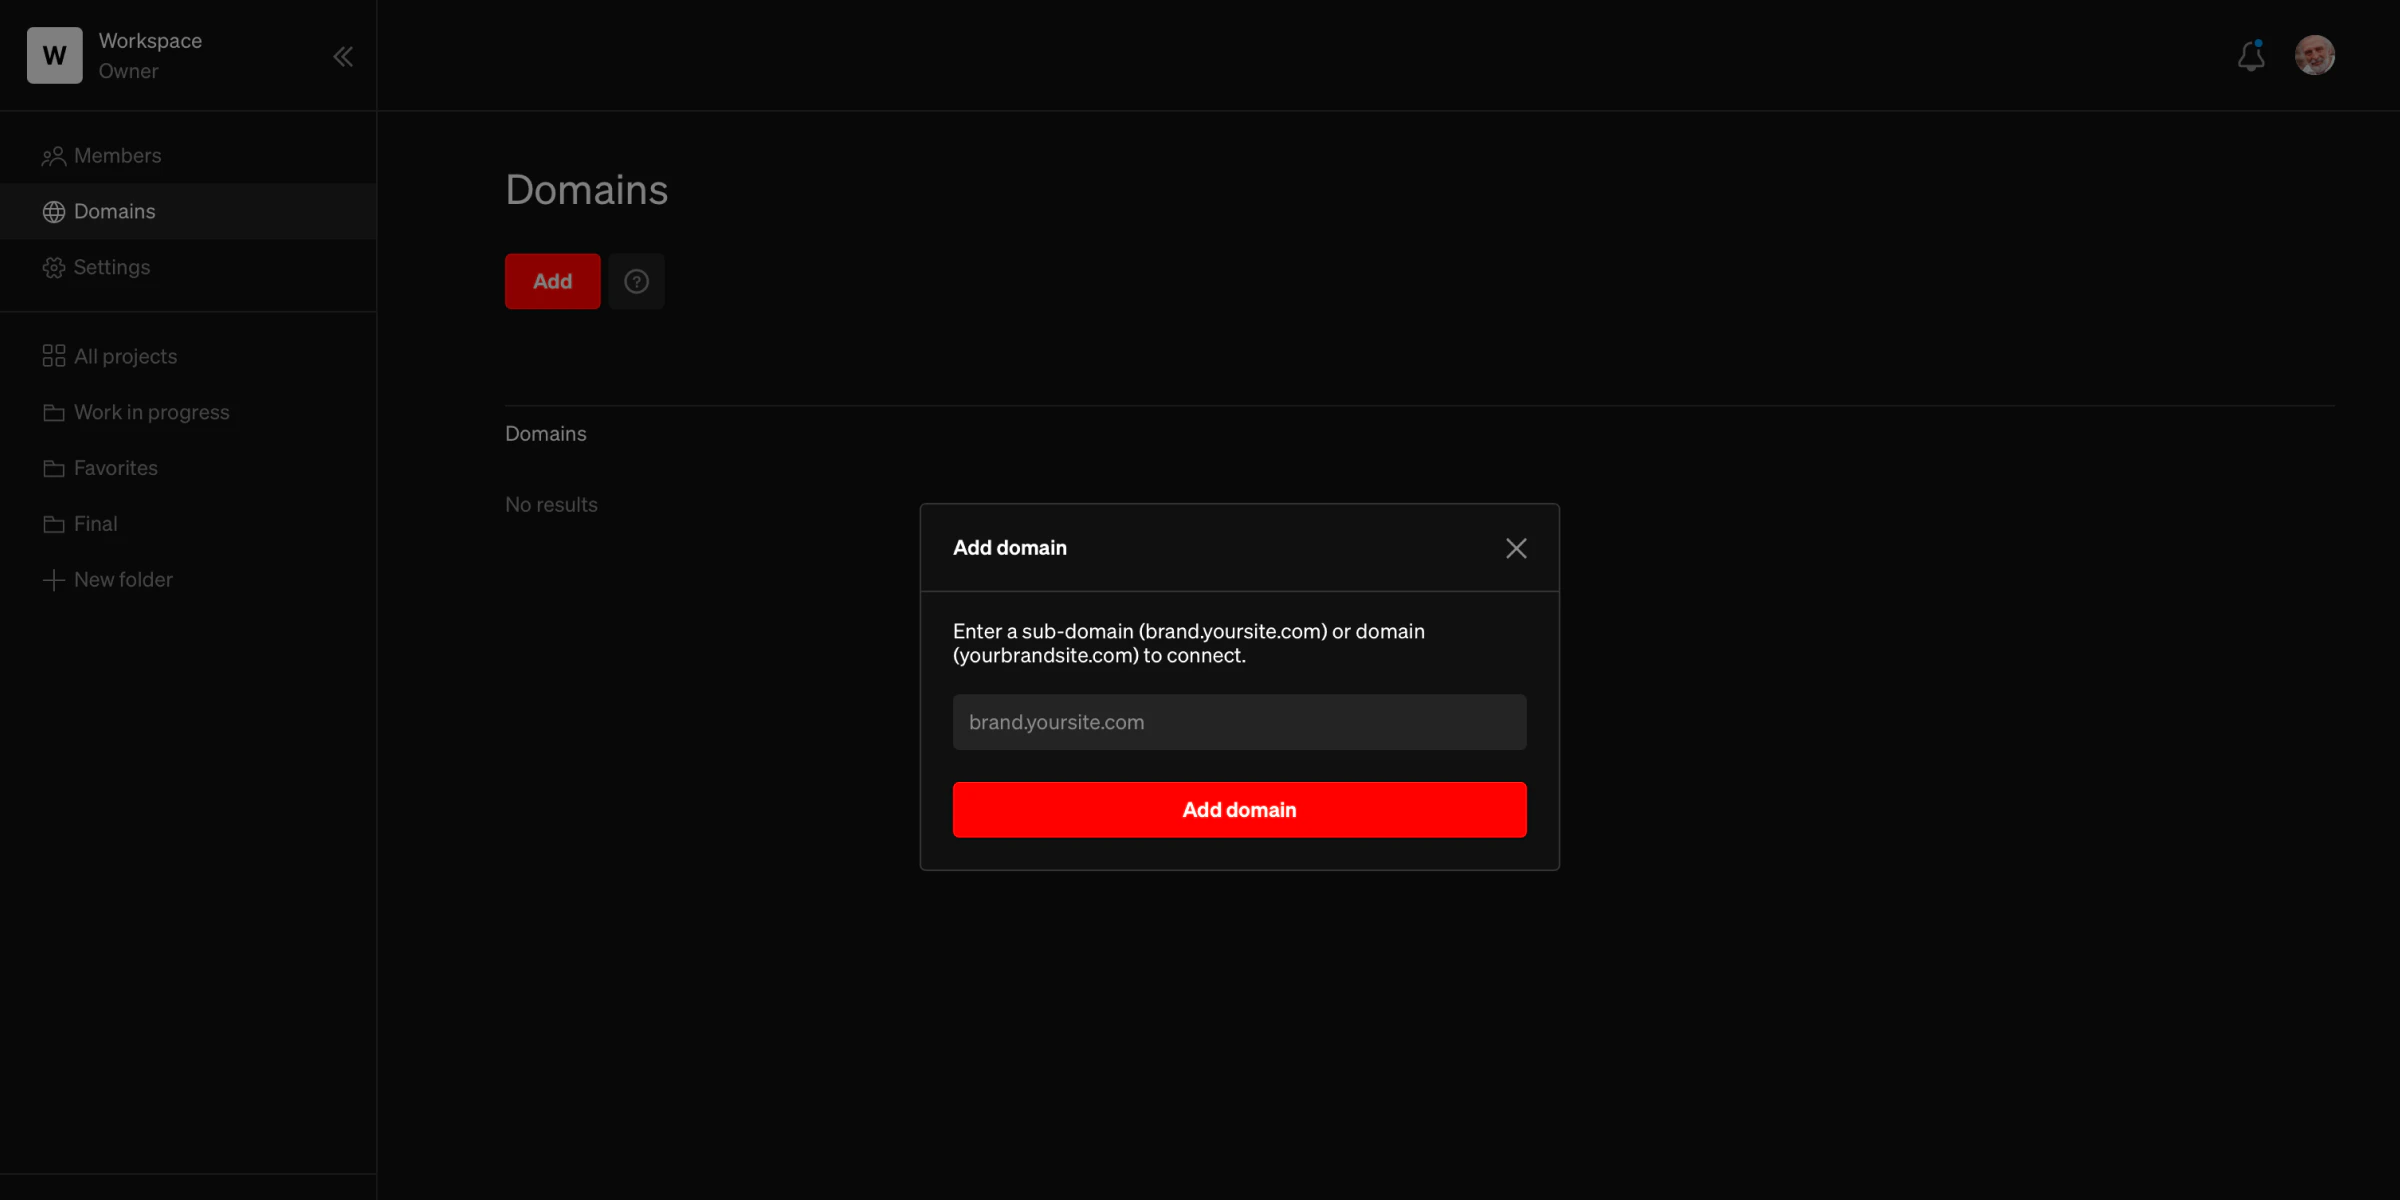 * Within the dashboard, select **Domains**
* In the add domain field, enter either a base domain (example: **mybrand.com**) or subdomain (example:**identity.mybrand.com** )
* When done, select **Add**
In the following prompt, you will reference and copy the two DNS records, and add them into your domain provider (such as Godaddy or Namecheap).
* Within the dashboard, select **Domains**
* In the add domain field, enter either a base domain (example: **mybrand.com**) or subdomain (example:**identity.mybrand.com** )
* When done, select **Add**
In the following prompt, you will reference and copy the two DNS records, and add them into your domain provider (such as Godaddy or Namecheap).
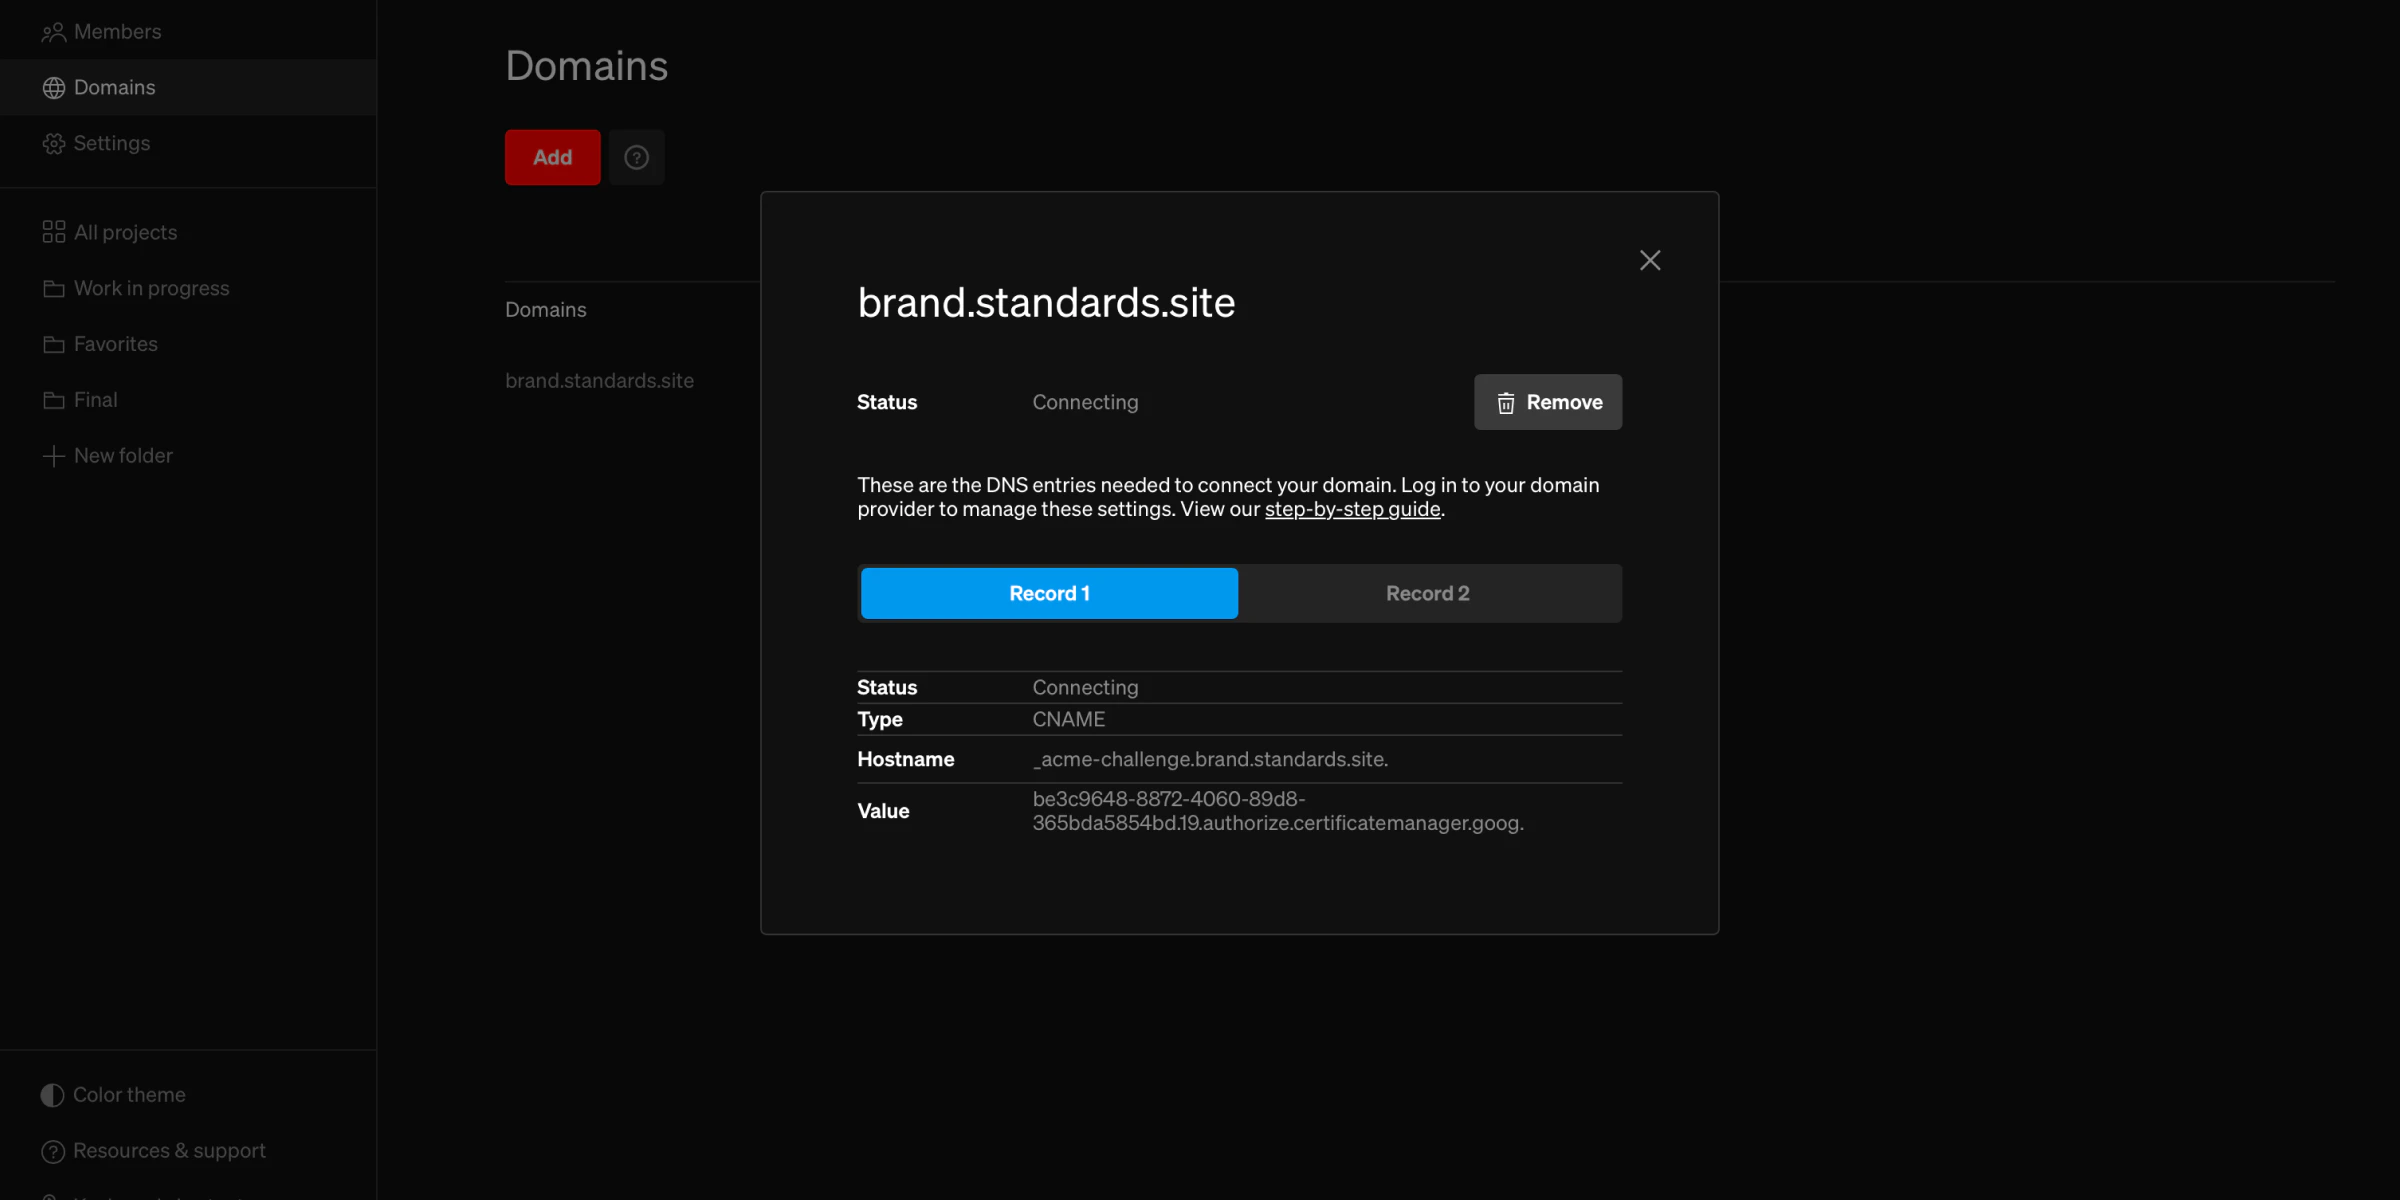 * The **CNAME** record proves that you own the domain, which allows us to issue a SSL certificate which will keep the site secure.
* The **A** record, which directs internet traffic to the Standards servers.
Go to your domain provider (such as Godaddy or Namecheap) and follow the steps outlined in the guides above. If you have another provider, you can most likely follow these same steps.
***
## Add records to DNS admin
The second step it to log into your DNS admin interface to add the A and CNAME records generated in the above step. This will be the domain registar. See your registrar for steps to add records, or follow the below step by step guides on two common domain registrars.
### [Connect a GoDaddy domain](/connect-godaddy-domain)
### [Connect a Namecheap domain](/connect-namecheap-domain)
**Note:** If you have another provider, you can most likely follow these same steps.
***
## Use custom domain
From the dashboard, choose the project you would like to to use a custom domain.
Select the `Publish & share` button, then select the URL beneath **Web address** title.
Within the web address section, select the `Custom` tab, then select the domain you would like to publish to.
***
## Keep in mind
* A custom domain can only be used for a single project. For example, by adding [**mybrand.com**](http://mybrand.com) to your workspace and publishing a project using it, all traffic going to the custom domain would view the project. It is not possible to publish multiple projects to the same custom domain.
* Base domains ([**mybrand.com**](http://mybrand.com)**)** and subdomains **([identity.mybrand.com](http://identity.mybrand.com))** are considered separate domains. Many people prefer to publish guidelines to subdomains so the base domain can continue to host the brand’s website.
* After adding DNS records, make sure not do remove them, even after validation. If either DNS record is removed your published project will eventually not be viewable.
* Domains are added to workspaces, so any project within the workspace may use it.
* Learn more in [Publish & share](/publish-share)
***
## Requirements
* A **Pro** or **Enterprise** Standards plan. **Trials** cannot add custom domains.
* A registered domain with a third-party provider, such as [Godaddy](https://www.godaddy.com/) or [Namecheap](https://www.namecheap.com/).
* Access to the DNS records for the domain, often found in the domain account.
* The domain provider must allow edits to DNS records.
- Connecting a domain can take up to 72 hours. When the new domain connects, the status changes to `Available`. Once available, the domain is ready to use.
- If the connection process takes over 72 hours, there may be an issue with how the records were entered into the domain provider.
- If projects published to custom domains are no longer accessible, it is possible a record may have been deleted from your domain provider. Double check both the **CNAME** and **A** records are still set.
* The **CNAME** record proves that you own the domain, which allows us to issue a SSL certificate which will keep the site secure.
* The **A** record, which directs internet traffic to the Standards servers.
Go to your domain provider (such as Godaddy or Namecheap) and follow the steps outlined in the guides above. If you have another provider, you can most likely follow these same steps.
***
## Add records to DNS admin
The second step it to log into your DNS admin interface to add the A and CNAME records generated in the above step. This will be the domain registar. See your registrar for steps to add records, or follow the below step by step guides on two common domain registrars.
### [Connect a GoDaddy domain](/connect-godaddy-domain)
### [Connect a Namecheap domain](/connect-namecheap-domain)
**Note:** If you have another provider, you can most likely follow these same steps.
***
## Use custom domain
From the dashboard, choose the project you would like to to use a custom domain.
Select the `Publish & share` button, then select the URL beneath **Web address** title.
Within the web address section, select the `Custom` tab, then select the domain you would like to publish to.
***
## Keep in mind
* A custom domain can only be used for a single project. For example, by adding [**mybrand.com**](http://mybrand.com) to your workspace and publishing a project using it, all traffic going to the custom domain would view the project. It is not possible to publish multiple projects to the same custom domain.
* Base domains ([**mybrand.com**](http://mybrand.com)**)** and subdomains **([identity.mybrand.com](http://identity.mybrand.com))** are considered separate domains. Many people prefer to publish guidelines to subdomains so the base domain can continue to host the brand’s website.
* After adding DNS records, make sure not do remove them, even after validation. If either DNS record is removed your published project will eventually not be viewable.
* Domains are added to workspaces, so any project within the workspace may use it.
* Learn more in [Publish & share](/publish-share)
***
## Requirements
* A **Pro** or **Enterprise** Standards plan. **Trials** cannot add custom domains.
* A registered domain with a third-party provider, such as [Godaddy](https://www.godaddy.com/) or [Namecheap](https://www.namecheap.com/).
* Access to the DNS records for the domain, often found in the domain account.
* The domain provider must allow edits to DNS records.
- Connecting a domain can take up to 72 hours. When the new domain connects, the status changes to `Available`. Once available, the domain is ready to use.
- If the connection process takes over 72 hours, there may be an issue with how the records were entered into the domain provider.
- If projects published to custom domains are no longer accessible, it is possible a record may have been deleted from your domain provider. Double check both the **CNAME** and **A** records are still set.