> ## Documentation Index
> Fetch the complete documentation index at: https://help.standards.site/llms.txt
> Use this file to discover all available pages before exploring further.
# Accessibility
Web accessibility ensures that content is usable and inclusive for all individuals.
 ***
## Image descriptions
When using Media throughout your project, it is important to keep accessibility in mind. Standards allows you to include meta descriptions for both **Media** elements, and the **Files** themselves.
### What image descriptions are
Image descriptions are short text based statements that describe the subject or the meaning of visual content, and are programmed to display when that visual content is not available, such as when browsing with a screen reader.
### How descriptions are displayed
* If a **Media** element and the **File** it’s referencing both include a description, the **Media** description will be shown.
* If a **File** includes a description, but the **Media** element referencing that file does not, the **File** description will be shown.
* If neither the **Media** element or the **File** it’s referencing include a description, no description will be shown.
### Writing descriptions for Media elements
When writing a description for a **Media** element, it is often best practice is to describe the context or meaning of the media rather than the subject, since the file could easily change. **Example:** “Demonstration of proper logo clearspace equal to the logotype’s x-height”
### Add image descriptions to Media
***
## Image descriptions
When using Media throughout your project, it is important to keep accessibility in mind. Standards allows you to include meta descriptions for both **Media** elements, and the **Files** themselves.
### What image descriptions are
Image descriptions are short text based statements that describe the subject or the meaning of visual content, and are programmed to display when that visual content is not available, such as when browsing with a screen reader.
### How descriptions are displayed
* If a **Media** element and the **File** it’s referencing both include a description, the **Media** description will be shown.
* If a **File** includes a description, but the **Media** element referencing that file does not, the **File** description will be shown.
* If neither the **Media** element or the **File** it’s referencing include a description, no description will be shown.
### Writing descriptions for Media elements
When writing a description for a **Media** element, it is often best practice is to describe the context or meaning of the media rather than the subject, since the file could easily change. **Example:** “Demonstration of proper logo clearspace equal to the logotype’s x-height”
### Add image descriptions to Media
 Within the design or content mode of the editor, select a media element
When in design mode, enter the description into the right sidebar in the **Accessibility** settings group. In content mode, enter the image description in the contextual popup.
### Add image descriptions to a File
Within the design or content mode of the editor, select a media element
When in design mode, enter the description into the right sidebar in the **Accessibility** settings group. In content mode, enter the image description in the contextual popup.
### Add image descriptions to a File
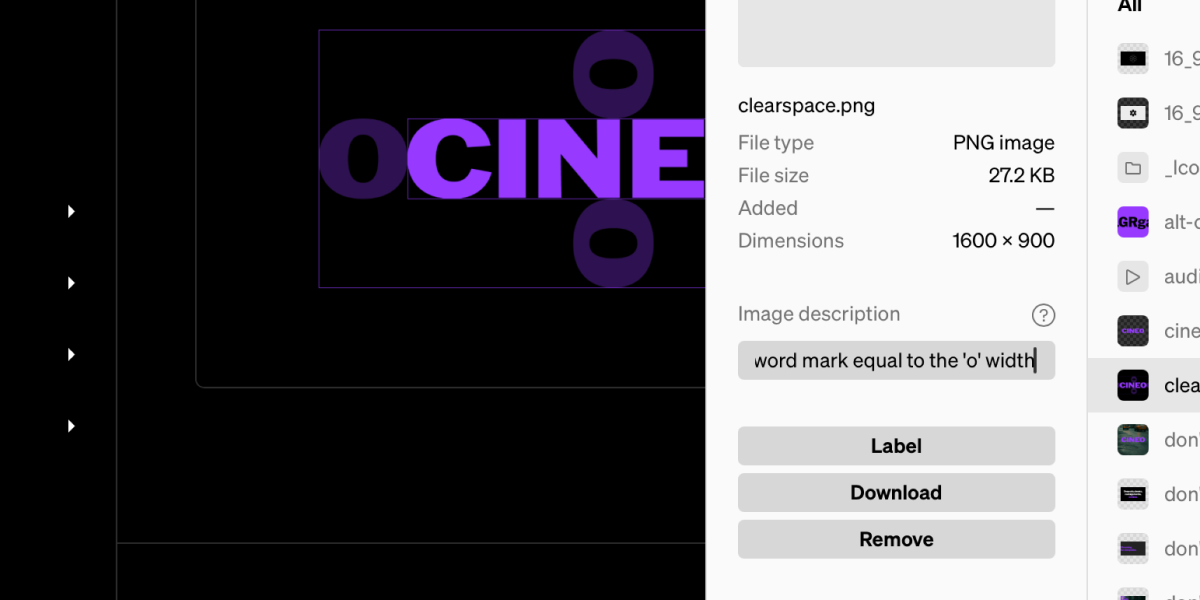 Within the editor, select the **Files** tab from the top of the right sidebar. Then select the desired file.
From the file detail panel, enter the description into the **Image description** field.
**Note:** Replacing a file will reset the image description
When writing a description for a **File**, the best practice is to simply describe the subject or content rather than the meaning, since it could be placed in any context. **Example:** “Logo surrounded by an empty frame defined by the height of the symbol”
### Add descriptions to Buttons
Within the editor, select the **Files** tab from the top of the right sidebar. Then select the desired file.
From the file detail panel, enter the description into the **Image description** field.
**Note:** Replacing a file will reset the image description
When writing a description for a **File**, the best practice is to simply describe the subject or content rather than the meaning, since it could be placed in any context. **Example:** “Logo surrounded by an empty frame defined by the height of the symbol”
### Add descriptions to Buttons
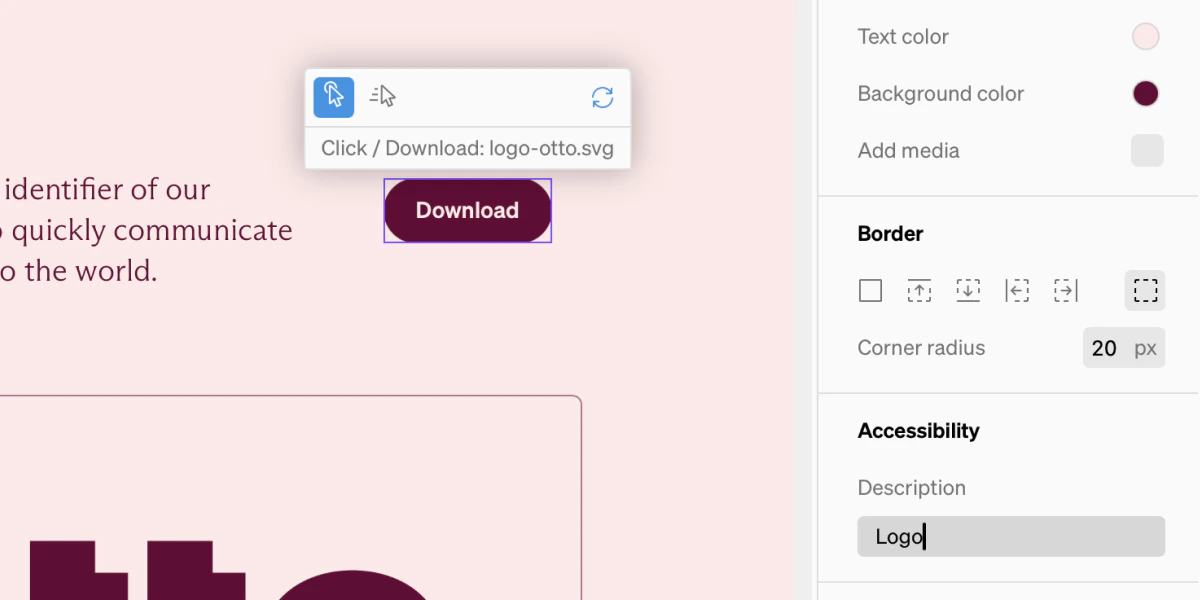
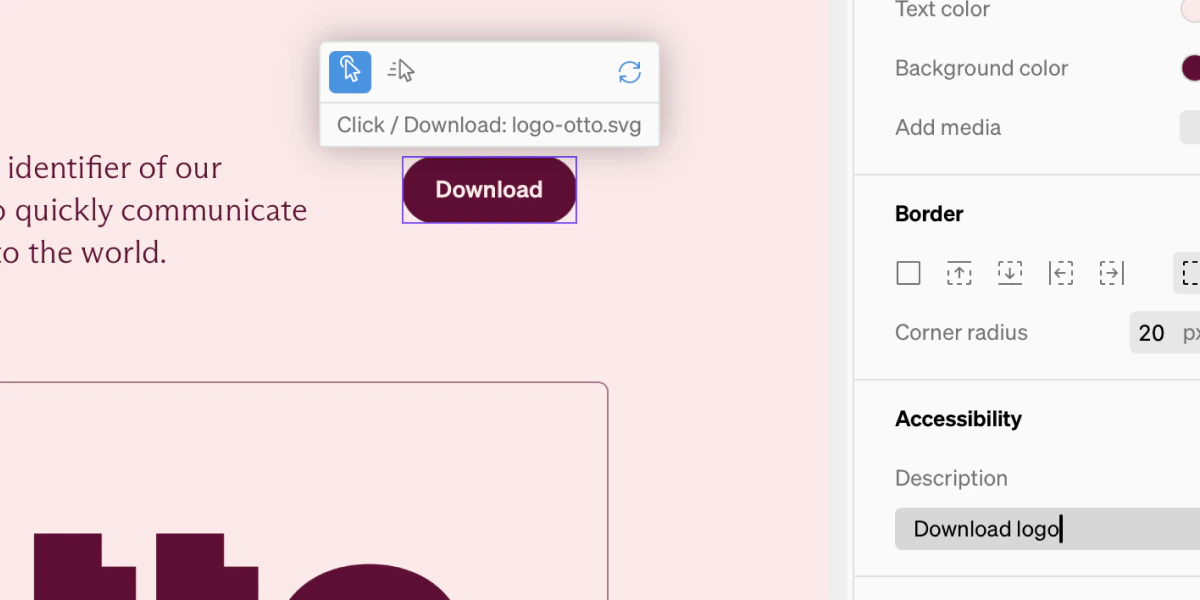 From within the editor, select the button
* Use action verbs
* Be specific about the target
* Avoid generic labels
* Don't include the word "button"
* Icon-only buttons still need a label
***
## Section labeling for screen readers
Improve navigation for screen readers by labeling sections of a page. Add a label to each major section of your page. This label is used by screen readers to identify the section and enables jump navigation for keyboard users.
### Add section labeling
From within the editor, select the button
* Use action verbs
* Be specific about the target
* Avoid generic labels
* Don't include the word "button"
* Icon-only buttons still need a label
***
## Section labeling for screen readers
Improve navigation for screen readers by labeling sections of a page. Add a label to each major section of your page. This label is used by screen readers to identify the section and enables jump navigation for keyboard users.
### Add section labeling
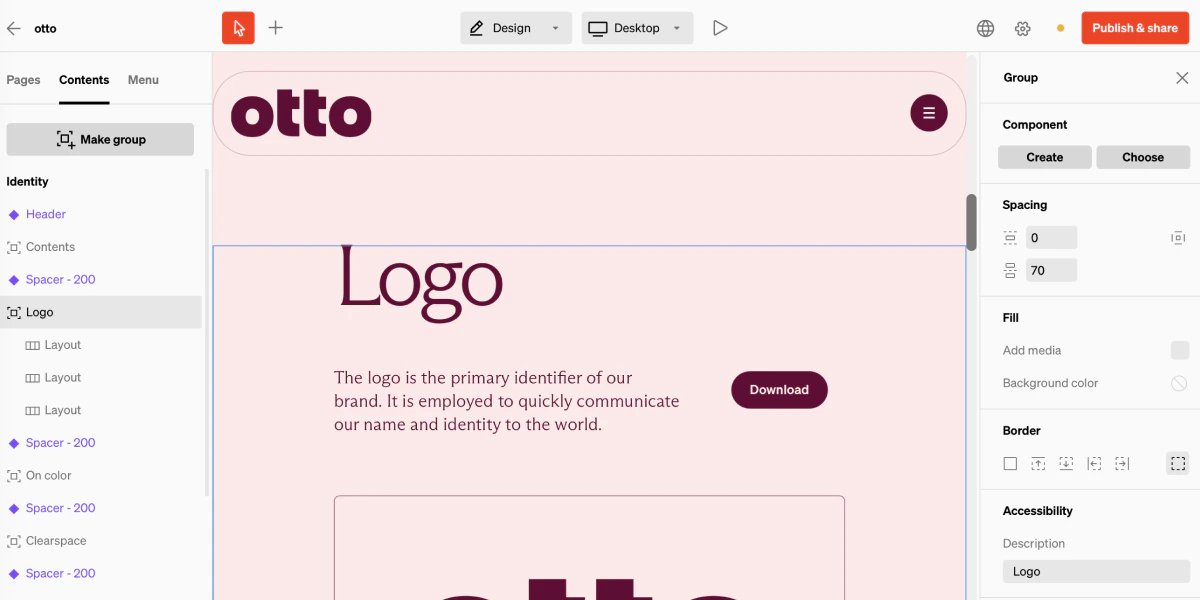 This is a good practice while working to stay organized. Select contents layers then group them together by pressing `Make group` in the sidebar, or command G
With the group or layout layer selected, look for the Accessibility settings group in the right sidebar. Enter the appropriate section label — for example, "Brand Colors" or "Typography."
***
## Content tags
Adding content tags to text provides data that may be used by browsers and search engines to infer the hierarchy of text content without visual cues, and may effect how the text is displayed on screen readers or in other environments.
### Add tags to text
This is a good practice while working to stay organized. Select contents layers then group them together by pressing `Make group` in the sidebar, or command G
With the group or layout layer selected, look for the Accessibility settings group in the right sidebar. Enter the appropriate section label — for example, "Brand Colors" or "Typography."
***
## Content tags
Adding content tags to text provides data that may be used by browsers and search engines to infer the hierarchy of text content without visual cues, and may effect how the text is displayed on screen readers or in other environments.
### Add tags to text
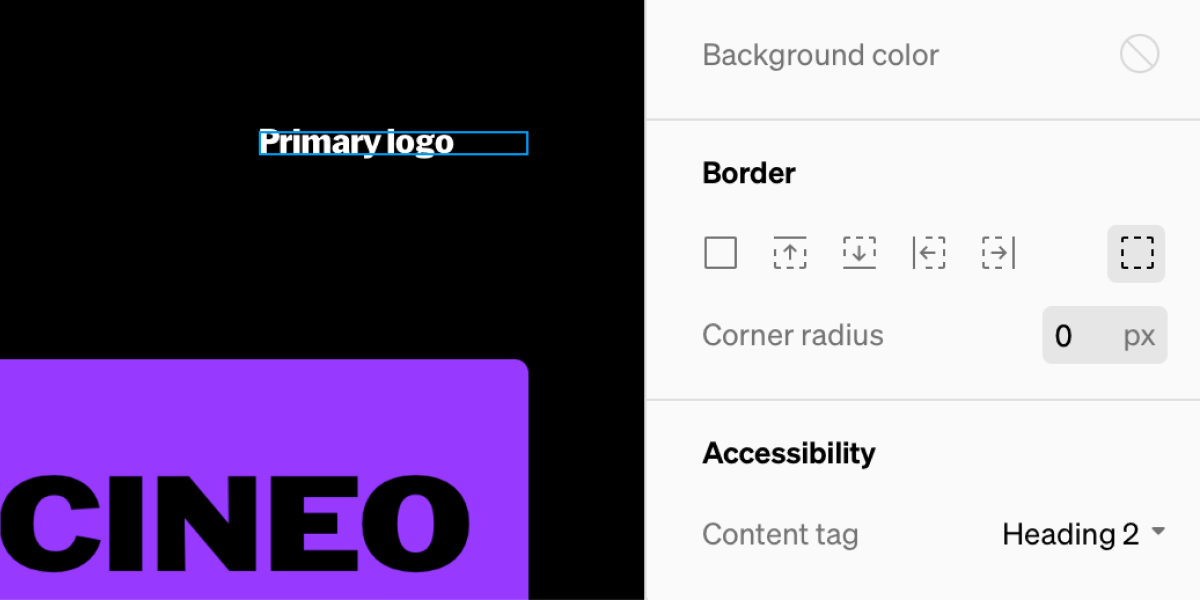 Within the editor, select a text block from the contents list in the left sidebar, or from the in-body content.
In the right sidebar at the bottom, there is a settings group named **Accessibility.** Select the **Content tag** dropdown, then select the tag that best fits the text content
### Tags
* **Paragraph:** Represents a paragraph. Paragraphs are usually represented in visual media as blocks of text separated from adjacent blocks by blank lines.
* **Heading 1 - 6:** Represent six levels of section headings. Heading 1 is the highest section level and heading 6 is the lowest.
### Best practices
* One H1 per page, typically the page title.
* Don't skip levels (H1 → H3 skipping H2 is a no)
* Nest logically: H2's are sections, H3's are subsections within those, etc.
***
## UserWay plugin
Additional accessibility features can be enabled on Standards projects with the UswerWay plugin. UserWay allows site visitors to control a range of accessibility options like increasing text size. Learn more about [UserWay](http://userway.org/).
### Enable UserWay on your project
Note: This **does not require** a UserWay account
Within the project editor, select the gear icon from the top bar.
Within the project settings in the right sidebar, look for the **Accessibility** settings group, toggle on the UserWay plugin.
Publish the changes from the **Publish & share** window. The UserWay plugin now viewable on your live site.
### Add optional UserWay account ID
**Note:** This **requires** a UserWay account, allowing for additional features. Additionally, the integration is only available when published to a custom domain.
Log into your UserWay account on [userway.org](http://userway.org). If you don't have an account, sign up for one.
In the UserWay dashboard, select the **Embed code** tab from the left sidebar.
From the embed code, look for the ID just after **data-account=** between the quotation marks. Copy the ID to your clipboard, ctrl+Con your keyboard
Within the editor, select a text block from the contents list in the left sidebar, or from the in-body content.
In the right sidebar at the bottom, there is a settings group named **Accessibility.** Select the **Content tag** dropdown, then select the tag that best fits the text content
### Tags
* **Paragraph:** Represents a paragraph. Paragraphs are usually represented in visual media as blocks of text separated from adjacent blocks by blank lines.
* **Heading 1 - 6:** Represent six levels of section headings. Heading 1 is the highest section level and heading 6 is the lowest.
### Best practices
* One H1 per page, typically the page title.
* Don't skip levels (H1 → H3 skipping H2 is a no)
* Nest logically: H2's are sections, H3's are subsections within those, etc.
***
## UserWay plugin
Additional accessibility features can be enabled on Standards projects with the UswerWay plugin. UserWay allows site visitors to control a range of accessibility options like increasing text size. Learn more about [UserWay](http://userway.org/).
### Enable UserWay on your project
Note: This **does not require** a UserWay account
Within the project editor, select the gear icon from the top bar.
Within the project settings in the right sidebar, look for the **Accessibility** settings group, toggle on the UserWay plugin.
Publish the changes from the **Publish & share** window. The UserWay plugin now viewable on your live site.
### Add optional UserWay account ID
**Note:** This **requires** a UserWay account, allowing for additional features. Additionally, the integration is only available when published to a custom domain.
Log into your UserWay account on [userway.org](http://userway.org). If you don't have an account, sign up for one.
In the UserWay dashboard, select the **Embed code** tab from the left sidebar.
From the embed code, look for the ID just after **data-account=** between the quotation marks. Copy the ID to your clipboard, ctrl+Con your keyboard
 Back in Standards, enter the project editor by selecting the gear icon from the top bar.
Within the project settings in the right sidebar, look for the **Accessibility** settings group. Paste the ID into the **Account ID** field.
Publish the changes from the **Publish & share** window. The UserWay plugin now viewable on your live site.
***
## Resources
Learn more about improving site accessibility: [https://www.w3.org/TR/WCAG22](https://www.w3.org/TR/WCAG22)
Check color contrast: [https://webaim.org/resources/contrastchecker/](https://webaim.org/resources/contrastchecker/)
Back in Standards, enter the project editor by selecting the gear icon from the top bar.
Within the project settings in the right sidebar, look for the **Accessibility** settings group. Paste the ID into the **Account ID** field.
Publish the changes from the **Publish & share** window. The UserWay plugin now viewable on your live site.
***
## Resources
Learn more about improving site accessibility: [https://www.w3.org/TR/WCAG22](https://www.w3.org/TR/WCAG22)
Check color contrast: [https://webaim.org/resources/contrastchecker/](https://webaim.org/resources/contrastchecker/)